Pancakes and Waffles (sans gluten and dairy)

Many years ago, we were told to stop feeding our daughter gluten, and some time later we were told it was okay to give her gluten again… whether she needed it or not, one of the things we kept making gluten free was pancakes.

The recipe we found was one we enjoyed enough to keep using regardless of whether we needed to keep gluten out of our diets. For many years, though, we knew we couldn’t use it for pikelets… this may be a unique Australian thing, but it is a common morning tea to have them cold with a little butter and jam. However, with our recipe, if they weren’t eaten immediately, they went out for the birds.

Now, my partner is not just intolerant of gluten, but also dairy. This has given me reason to experiment with various recipes, and now I have a gluten and dairy free pancake recipe that works well for cold pikelets too… and best of all, it can also be poured into a waffle maker for some stand-up waffly goodness.

Pancakes

Ingredients

  • Egg, 1
  • Flour, self-raising gluten-free, 2 cups
  • Almond meal, 1 cup
  • Apple sauce, 2 tablespoons
  • Coconut cream, 1 cup
  • Almond milk, 2 cups
  • Vanilla, 1 teaspoon
  • Baking powder, 1 teaspoon
  • Salt, ½ teaspoon

Method

  1. Add all ingredients to a mixing jug and whisk vigorously
  2. Refrigerate overnight (optional, but 12 hours in the fridge before cooking does improve the texture)
  3. Prepare a clean frying surface to medium-high heat
  4. Add a small amount of coconut oil to the surface (optional, but it facilitates even frying and need only be done once if your surface is non-stick)
  5. Give your batter a light whisk and pour onto frying surface at your desired size
  6. When bubbles form on top and remain open, turn the pancake
  7. Fry for a similar amount of time on the second side.

Click here for a pdf version of this recipe.

Posted in Anglo Australian Foods, Dairy Free, gluten free | Tagged , , , , , , , , , , | Leave a comment

Rhubarb Syrup

As a child I didn’t like rhubarb, but there came a point when the flavour started to grow on me, even if the texture of the conventional stewed stalk didn’t. Some years ago I thought it would be great to create a syrup from the plant that took advantage of the flavour.

Well, I finally got around to that this year.

The syrup I created has a wonderful depth of flavour and a sharp tart note that lends it a fantastic zing! Use it as an ice cream topping, over pancakes, in milkshakes or cocktails. The most surprisingly wonderful use we’ve found is as a finisher for our home-brewed kombucha.

This is not a recipe in the conventional sense: few people buy rhubarb, and the harvest can be unpredictable. Also, the basic recipe only has two ingredients, so this recipe just uses relative quantities.

The ingredients in grey are all optional: use all of them, use some of them, or use none of them; but if you’re adding spices, just make sure you use them whole (chunks for nutmeg) rather than ground. Obviously you can use the seeds from a vanilla pod for one recipe, and use the pod for this one, although you could add a few drops of essence if you like.

As a syrup, this is mostly just sugar, so it will last for a couple of years in the fridge… the bigger risk is someone guzzling it down!


Rhubarb Syrup Banner

Ingredients

  • Rhubarb stalks
  • White sugar
  • Cloves
  • Nutmeg
  • Cinnamon
  • Star anise
  • Vanilla


Method

  1. Clean the rhubarb thoroughly, then chop, placing them either in a large pot, or your crock pot insert
  2. Add enough sugar to cover the rhubarb (this is a syrup: don’t be shy with the sugar!)
  3. Cover and leave to macerate for at least 12 hours
  4. Add spices according to your preference
  5. Place on a low heat with the lid on and allow to stew slowly until the rhubarb breaks down (2-4 hours)
  6. Strain, and return the liquid to an appropriately-size pot
  7. Bring the liquid to a higher heat, a little below the boil and allow it to reduce to about 50% of its original volume
  8. Allow the syrup to cool without a lid, then refrigerate.

Click here for a pdf version of this recipe.


Posted in Anglo Australian Foods, Desserts, Uncategorized | Tagged , , , , , , , , | Leave a comment

Eating Well

I always eat well. I just don’t always eat what’s best for me…

Just yesterday I wanted to make some biscuits for my kids to eat when they got home from school. My last batch had run out, and I didn’t have anything exotic in the pantry, but I did have an inordinate quantity of almond meal, and since I usually like things made with almond meal, I went hunting for a new recipe.

Most of the recipes I found were created particularly for paleo diets, and others were made for gluten free diets. I’m lucky enough not to need to worry too much about what I eat (though I should worry more about the quantity I eat), and I ended up struggling to choose between two recipes. Ultimately, as is usually the case, I just made both, but I didn’t follow either exactly.

One lot of biscuits, a paleo recipe, were satisfactory. Nothing special, but edible, and they’ll be gone before the week’s out. The other, though, will be lucky to make it to the end of the day. They’re chewy and gooey and delicious, just as all the best biscuits are. They’re by no means a healthy option, but they are low in fat, and I was very pleased to be able to send my niece home with a few gluten free biscuits, mostly by luck rather than design.

I really don’t like the idea of substituting things in a diet. I just don’t understand the idea of using gluten free bread to eat gluten free, rather than just not eating bread. It makes so much more sense to me that if a particular food contains an ingredient that does you harm, you just stop eating it, rather than pretending. There are so many wonderful foods out there that, if I (touch wood) ever had to stop eating something like gluten, I wouldn’t try for dodgy substitutes, I’d either cut it out of my diet, or decide that life isn’t worth living without this food.

But then recipes like this come along. These biscuits don’t apologise for being gluten free, they just stand proudly and boast about being the best bloody almond biscuit you’ve never tasted. That’s really what eating well means.

2016-02-13 Almond Biscuits 017apvs

Almond Biscuits

Ingredients

  • almond meal, 2 cups
  • icing sugar, 2 cups
  • egg white, 2 (medium)
  • almond essence, 1 teaspoon
  • vanilla essence, 1 teaspoon
  • almond chunks, ¼ cup
  • small chocolate chips or chunks, ¼ cup
  • cocoa, ½ tablespoon
  • icing sugar, ½ tablespoon


Method

  1. Preheat the oven to 170°C
  2. Mix icing sugar, cocoa, chocolate chips and almond chunks in a small bowl and set aside
  3. Place almond meal, icing sugar (2 cups), egg white and essences in a food processor, and whiz until you have a gooey paste
  4. Take a big teaspoon of the mixture at a time, roll it in the chunks, and place on a baking tray
  5. Bake for 15 minutes, and cool.Click here for a pdf version of this recipe.
Posted in Biscuits, Uncategorized | Tagged , , , , , , , , , , , | Leave a comment

Bûche de Noël

For several years, this has been my favourite Christmas recipe, and the reason is simple: it has some of the characteristic flavours of a very Eurocentric Christmas, but without any bloody dried fruit!

I mean really, think about it: refrigeration has been available for almost a century. Fridges have been a standard fixture in homes for over half a century, and the technology has been used in food transportation for almost as long. Air freight for food has also been an economic reality for decades now, so really, seriously, in absolute reality, there is no longer any reason to take good fruit and make it bad, then pretend to like it, is there?

Not that there was ever a reason to have dried fruit in my home country at Christmas! By late December in Australia, cherries have been going for weeks, raspberries are happening in the high country, stone fruit is everywhere and grapes are starting! There is no reason whatsoever to eat dried bloody fruit! It is uncivilised and quite unnecessary.

2014-12-25 Christmas 078asBut I was well into my thirties before I discovered this very special cake, which combined the spices that old folk put in horrible monstrosities like fruit cake and Christmas pudding with civilised, modern flavours like chocolate and hazelnut.

I’ve tweaked it a little, and this is the version I prefer. The spices and cocoa are an addition I have made to stamp the character of the cake a little more, and the idea of sifting hazelnut meal ensures the cake stays light, but you can use whole hazelnut meal if you prefer. I usually use the larger bits that I keep out of this recipe in my chocolate balls.

It really is a very simple recipe, and the cake itself takes almost no time to prepare. It can easily be prepared up to step 11 a day in advance, and the filling and dressing can be done in barely fifteen minutes, so it really is perfect for Christmas dinner.

If you are making something like rum balls, they make a perfect accompaniment, especially if you make old peoples balls (the ones with dried fruit in them) as a way of appeasing the wrath of people with no taste. If you encase them in chocolate, the fruit shouldn’t contaminate the cake, but I’d still make sure they’re on a separate table, and not prepared in the same kitchen, to ensure there’s no trace of the horror in my Bûche.

Joyeux Noël tout le monde!

2014-12-25 Christmas 068apvsBûche de Noël

Ingredients

  • chocolate, 70%+ cocoa solids, 30 grams
  • eggs, 4
  • caster sugar, ¾ cup
  • water, 2 tablespoons
  • bicarbonate of soda, ¼ teaspoon
  • self raising flour, ½ cup
  • plain flour, 1 tablespoon
  • hazelnut meal[1], ⅓ cup
  • cocoa, 1 teaspoon
  • Christmas spices[2], 1 teaspoon
  • caster sugar, extra
  • mascarpone, 500g
  • cream, thickened, 1½ cups
  • white sugar, 1 tablespoon
  • vanilla essence, 1 teaspoon


Method:

  1. Preheat oven to 180°C and place a ramekin of water onto the oven floor.
  2. Brush the sides of a lamington tin and line it with baking paper, ensuring the baking paper sticks up sufficiently above the top of the tin on the short sides to grab it with your hands.
  3. Melt the chocolate in a double boiler.
  4. While the chocolate is melting, sift the hazelnut meal and discard the larger bits, ensuring there is still ⅓ of a cup of the finer meal. Sift this along with the other flours and cocoa.
  5. When the chocolate is getting close to melted, beat the eggs with the caster sugar until beating eggs and sugarpale and frothy (this may take up to ten minutes).
  6. Warm the water and mix the bicarbonate of soda into it, then add to the chocolate, mixing continuously until combined. The mixture will appear to split.
  7. Sift flours again over the frothy eggs, add the chocolate mixture and fold through.
  8. Pour the batter into the prepared tin and gently spread it to the corners.
  9. Bake for 10 minutes or until a toothpick inserted into the centre comes out clean. While the cake is baking, lay out another sheet of baking paper and sprinkle it with caster sugar.
  10. When the cake is ready (be very careful not to overcook it), remove it from the tin using the overhanging paper. Quickly turn it onto the paper with the sugar, remove the top cool in the paperlayer of paper and trim the crisp edges (the long edges can be left if they’re not too crisp, but the short sides must be trimmed). Roll the cake, with the baking paper, very carefully.
  11. Keeping the seam side down, allow the cake to cool completely in the paper. A bowl may be used to keep it from unrolling.
  12. Beat the mascarpone, cream, white sugar and vanilla essence until thick, being careful not to overwhip the cream. Unroll the cake carefully and spread with the cream mixture while re-rolling it. Place it on a serving plate and use the remaining cream mixture to cover it completely.

Click here for a pdf version of this recipe.

[1] To lighten the cake and for ease of rolling, sift the hazelnut meal and discard the larger bits before measuring. If you opt not to do this, add the hazelnut meal separately from the flour.

[2] To mix your own Christmas spices, mix ground nutmeg, cinnamon, cloves and allspice.

Posted in Anglo Australian Foods, Cake | Tagged , , , , , , , , , | Leave a comment

Lemon Cordial

When I was much younger and living in western Sydney, one of my favourite things to do on a weekend was to go with one of my friends to visit her mother on the south coast of New South Wales, in a little place called Tomerong.

Tomerong was less a village and more a concentration of ten-or-so houses not so far from each other. It’s not much more village-like now. My friend’s mother was an amazing cook. She’d not boast about it, far less write a blog about it, but she used to make some of the most amazing meals from the humblest of ingredients. Her style was homely without ever coming close to being stodgy.

One of my favourite things, though, was a lemon cordial, which she made using lemons from her own tree. I eventually asked for the recipe, and I secreted it away among my own, just making it occasionally.

When I became a father, though, I was much more inclined towards these more natural alternatives. When you don’t have lemons from your own tree, they can be expensive. And really, with the amount of sugar in this recipe, I wouldn’t even say it’s healthier. But it’s certainly yummier than any lemon drink I’ve ever bought. And it serves a myriad of purposes, for example:

  • A dollop of this syrup, mixed with soda water, Angostura bitters, ice and a few slices of lime, makes the best lemon, lime and bitters you’ll ever have.
  • A little mixed in with sparkling spring water, ice and mint leaves is about as refreshing as it comes.
  • And a tablespoon of this in a bread dough  in place of the sugar is a subtle flavour enhancer.

Of course, mostly, it’s just something that satisfies my kids’ craving for a sweet drink after school.

This recipe has the base quantities, but it is infinitely duplicable. I used to multiply these by four, and my kids would demolish it in two weeks. Now that they’re a little over it, I usually double it to get a little over two litres of syrup. That two litres will make over twelve litres of cordial ready for drinking.

You can also adapt it to orange cordial, but the proportions require a little adjustment. In the .pdf version of my recipe I list the quantities for single and triple quantities; to make an orange cordial, substitute the lemons for oranges (obviously), but use the triple quantities and add an extra orange.

The syrup must be kept in the fridge. If left out on the bench, it will grow mould within a matter of hours (longer if diluted). In the fridge, it will last three to four weeks. If you notice  strains of white suspended in the liquid, that’s mould, and it isn’t safe to drink anymore.

Knowing the recipe by heart, and with years of practice in peeling lemons without the pith, I knock this out in a matter of ten minutes, making it a really easy way to cut down on preservatives (and, believe it or not, sugar!).


2015-05-23 lemon cordial

Lemon Cordial

Ingredients

  • lemon, 1
  • sugar, 2 cups
  • tartaric acid, 3 teaspoons
  • boiling water, 2 cups

Method

  1. Peel lemon rind into basin.
  2. Cut off white pith and discard.
  3. Slice lemon thinly and add to peel in basin.
  4. Add hot water, sugar and tartaric acid.
  5. Stir until dissolved and leave to cool.
  6. Cover and refrigerate overnight
  7. Strain and bottle.Click here for a pdf version of this recipe.
Posted in Drinks | Tagged , , , , , | Leave a comment

Parmigiana di Melanzane

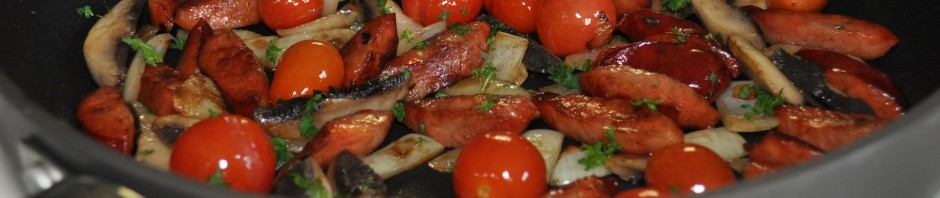
My niece contacted my partner and me recently asking about vegetarian recipes because she and her partner wanted to reduce the amount of meat in their diet. Though neither of us are vegetarians, we started rattling off dishes that they might like as we thought of them.

I have a lot of respect for vegetarians. I care about animal rights, and I really don’t think we need as much meat in our diets as we generally have in Australia. I don’t think I’d have the discipline to cut meat out of my diet entirely, and I’ve taken the more moderate approach of being selective about where I buy it. I’ve not bought meat at Coles even once since I learned that they buy feedlot beef many years ago (which may no longer be true), and I tend to favour Jordo’s Chop Shop, who publish the provenance of their products proudly, and have a strong commitment to both quality and humanity.

One of the dishes that came to mind when my niece asked about vegetarian dishes was this parmigiana, which is something I’ve not been doing long. I had been surprised to learn, during a conversation with a Neapolitan friend, that what I knew as a parmigiana is really a very Australian tradition. Though based on a traditional dish from Italy’s southern regions, the idea of sticking chicken in it (especially deep fried, crumbed chicken as pubs tend to) really belongs in more meat-obsessed cultures like ours.

My friend from Naples made me a traditional parmigiana di melanzane, and I was hooked. Few vegetarian dishes can draw my attention the way this does, and my second daughter has become a big fan (Offspring Numbers One and Three are less impressed).

Now, I can’t claim this recipe as especially traditional. I sort of made it up, based on what my Neapolitan friend did, but I really just practised and made it in a way that works in my kitchen for my family and on my schedule. I suspect Italians would just scoff, but I still think it’s great.

You can adjust to your heart’s content. If I’m wanting to make it easier on myself, I leave out the cheese sauce, using slices of bocconcini on every layer instead. And other times I’ve used both. Even the quantities in my recipe aren’t precise; watch out for the tilde (~) and use your judgement.

Parmigiana di melanzane has become something I turn to for when I want a meal prepared ahead but cooked fresh and served straight from the oven. It’s not a quick recipe, but during the five hours you will need to prepare it, you can mostly be doing other things. It is best to prepare the two sauces early on in the eggplant drying process so that you can work with them after they’ve cooled. I often prepare this on a Sunday, but leave it in the fridge until later in the week. I’ve left it assembled but uncooked for four days once, then 45 minutes in a medium oven and it was perfect!

This is certainly my favourite vegetarian dish, or at least my favourite vegetarian meal (my favourite vegetarian dish would have to be hot chips!). It can also be made low(er) carb by reducing the cheese sauce or omitting it altogether.

parmigiana

Click here for a pdf version of this recipe.Parmigiana di Melanzane


Ingredients

  • eggplants, 2 large
  • olive oil, for sautéing
  • onion, 1 medium, chopped finely
  • carrot, 1 large, chopped finely
  • celery, ~4-5 stalks, chopped finely
  • garlic, 5 large cloves
  • paprika
  • tomato paste, 2 tablespoons
  • salt
  • pepper
  • tomato passata, ~1 bottle (or ~2 cans of diced tomatoes)
  • red wine, ~1 cup
  • butter, ½ cup
  • flour, plain, ½ cup
  • milk, ~1½ cups
  • egg yolk, 1
  • mozzarella cheese, grated, 2-3 cups
  • parmesan cheese, grated, 1- 1½ cups
  • bocconcini[1], 250 grams, sliced
  • basil leaves


Method

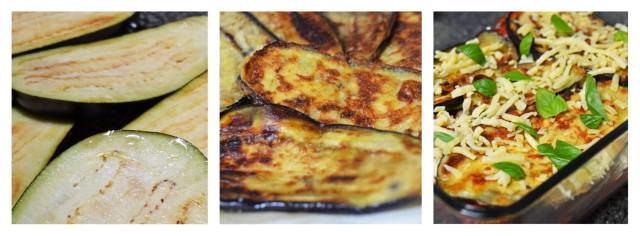
  1. Prepare the eggplants by slicing them lengthways to a thickness of 5mm and laying them out on a rack. Sprinkle them liberally on both sides with salt, and every hour pat them dry, turn them over and sprinkle them with salt again. This should be done at least four times over a period of four hours.[2]
  2. Prepare the tomato sauce: In a medium saucepan, sauté finely diced onions, carrot and celery over medium-low heat until just beginning to brown. Add garlic and paprika, and raise the heat, then add more olive oil and tomato paste. When the tomato paste has begun to caramelise, add passata and red wine until it forms a thickish sauce with an intense tomato flavour[3]. Add salt and pepper to taste, and set aside to cool.
  3. Prepare the cheese sauce: In a small saucepan, melt butter, add flour and stir to form a thick paste. Cook this while stirring until the raw flour smell has declined. Slowly add milk, about a tablespoon at a time, until the sauce it liquid, but still very thick. Add egg yolk and stir quickly until combined, then add 1 cup of mozzarella and ¼ cup of parmesan cheese and stir gently while it melts. Add milk a little at a time until the sauce is pourable but just a little thick.[4]
  4. When the eggplant is dry and floppy (4-6 hours), brush them with olive oil and barbecue or fry them until golden.
  5. Put the remaining shredded mozzarella and parmesan into a bowl and add about a tablespoon of paprika and toss the spice through.
  6. Spread a little tomato sauce on the bottom of a baking dish (about the size you would use for lasagne or moussaka), then lay eggplant slices out to cover the bottom of the dish. Cover this layer with tomato sauce, then sprinkle some fresh basil leaves and slices of bocconcini over. Repeat until the eggplant is used up or the dish is full.
  7. Cover the top layer of eggplant with cheese sauce, then cover the cheese sauce with paprika cheese.
  8. At this stage, the dish can be stored in the fridge. If storing, it is best to use a glass or ceramic baking dish and cover with cling film.
  9. Bake in a medium oven for 45 minutes or until the cheese on top is a rich golden brown.
  10. Traditionally, this is served by removing layers of eggplant, but if the eggplant is soft enough, you can cut it in chunks like a lasagne, just don’t expect it to hold together like a lasagne!

.

[1] Bocconcini can be replaced with the paprika cheese mix described at step 5 to reduce the cost of the dish. The cheese sauce can be omitted if using bocconcini, but it needs one or the other.

[2] This process is mainly intended to draw out the moisture from the eggplants. Most of the salt should be removed with the towel you pat them dry with, but the remaining salt is also there to soften the bitterness of the eggplant.

[3] It is possible to add some red lentils at this stage, as long as they have plenty of time to soften. They don’t adjust the flavour, but they increase the nutritional value of the meal.

[4] The cheese sauce can be omitted if using bocconcini, but it needs one or the other.

Posted in Italian, Low Carb, Mains, Vegetarian | Tagged , , , , , , , , , , , , , , , , , , | Leave a comment

Chocolate Chip Cookies

I’ve never found any kind of biscuit I like more than a chocolate chip cookie, and it’s not for want of trying. The only real risk involved is when you encounter a conniving cook who participates in the barbarian practice of substituting chocolate for dried fruits, presumably to punish recalcitrant children.

Several years ago, another parent brought a plate of the most wonderful chocolate chip cookies to some event. She was kind enough to provide the recipe, which served my household well for years, but after a long break from making these Kings of the Kitchen, I couldn’t find her recipe. Worse still; I’d lost contact and could not get in touch with this particular domestic goddess to do obeisance and supplicate until the recipe was once more forthcoming.

I tried many different recipes before stumbling upon some British research; possibly the most important scientific inquiry since the Rusmericans did something really cool involving the moon but no cookies.

The British investigation served me particularly well in developing a recipe that delivered results very similar to those of my fellow-parent’s recipe. I remembered some of the peculiarities of the technique, so I incorporated those in with my new recipe as I recorded it.

Of course, the story of the divine parent who shared her recipe might have been a nicer one to pass down the generations, but I’ll settle for impeccable CCCs.

Of course, if the specific qualities you appreciate in your CCCs are not represented here, you could use the British Research to achieve your own kind of perfection. I don’t care; I have biscuits to eat.


2015-05-22 CCCs 001aps

Chocolate Chip Cookies

Ingredients

  • butter, 125 grams
  • brown sugar, 1 cup
  • vanilla essence, 1 teaspoon
  • egg, 1
  • self-raising flour, 2 cups
  • plain flour, ½ cup
  • baking powder, 1 teaspoon
  • milk, 1 tablespoon
  • chocolate chips, ¾ cup

 Method

  1. Cream butter and sugar in an electric mixer, and beat until light and pale.
  2. While the butter and sugar are in the mixer, sift the flours with the baking powder.
  3. Add the egg and vanilla and combine thoroughly before adding the milk.
  4. Slow the mixer and add flour a spoonful at a time, but in quick succession. Refrain from beating once flour is added.
  5. Stir chocolate chips through by hand, then roll into balls.
  6. Refrigerate for the time it takes to heat the oven to 170°
  7. Bake for 8-10 minutes or until golden brown.
  8. Allow to cool on tray for 3 minutes before transferring to a wire rack to finish cooling.Click here for a pdf version of this recipe.
Posted in American Foods, Anglo Australian Foods, Biscuits | Tagged , , , , , | Leave a comment

Lemon Cake

I might seem to be on a bit of a cake binge, but I’ve been making this cake for a long time, and have slowly made little changes to improve it. It’s one of those reliable little recipes that I fall back on when I’m just needing something for a morning tea or some last-minute event and I don’t want to go to any trouble.

The obvious topping is a simple lemon butter icing, and that’s what I’ve been making since forever, but recently my partner suggested a white chocolate ganache. The ganache, with a little lemon zest through it, really complemented the cake, so it’s now my standard. It makes the cake a little more expensive, but it’s no more complex to make.

If you’re in a hurry, though, you can make this cake and be ready to serve it within an hour. Just whip up a lemon syrup while it’s in the oven, and pour that over while it’s still hot. They’ll think you knew they were coming much earlier!


2015-02-08 Cooking 016aps

Lemon Cake

Ingredients

  • butter, 125 grams
  • caster sugar, ¾ cup
  • lemon zest, 1 lemon, finely grated
  • eggs, 2
  • self raising flour, 1¼ cups
  • milk, 2 tablespoons
  • lemon juice, 2 tablespoons
  • white chocolate, 200 grams at room temperature
  • cream, 100 millilitres at room temperature

 Method

  1. Preheat the oven to 180˚C
  2. Grease and line a cake tin
  3. Place butter, sugar and lemon zest (reserve ½ teaspoon of zest for ganache) into a mixer and beat until fluffy and pale
  4. Add eggs, one at a time, and beat thoroughly into mixture
  5. Slow the mixer and add flour, a tablespoon at a time, until all combined
  6. Add milk and mix in thoroughly
  7. Add lemon juice and mix in thoroughly
  8. Pour into cake tin
  9. Bake for 30 minutes or until a toothpick inserted into the middle comes out clean.
  10. Turn upside-down onto cooling rack and allow the cake to cool completely
  11. Prepare a double boiler, placing white chocolate, cream and ½ teaspoon of lemon zest inside while still cold.Click here for a pdf version of this recipe.
  12. Apply heat and stir until melted
  13. Allow ganache to cool slightly, then apply to cake.
Posted in Cake, Desserts | Tagged , , , , | Leave a comment

Whole Banana Cake

Some time ago, on a trip to East Timor, I encountered a whole banana cake, which was quite a surprise.

I’m no fan of bananas. I have never liked them, and generally I don’t like banana cake either. But this cake, which included the skin of the banana, was amazing.

It wasn’t easy to find a recipe. In fact, I never did; I’ve experimented a little to get this the way I like it, but I’m happy with this recipe, and it seems to replicate fine.

One important characteristic is the softness of the banana skin. Over ripe bananas work best, and freezing them then defrosting them again before putting them into the food processor helps a lot. They should be completely black.

I like a lemon icing on this best, but a coffee icing works well too, and reflects the principal product of the country where I first encountered the idea of a whole banana cake.

2014-11-22 Blog 044bps

Whole Banana Cake

Ingredients

  • butter, 125g, softened
  • brown sugar, ½ cup
  • vanilla essence, 1 teaspoon
  • eggs, 2
  • bananas, 2, very ripe[1]
  • milk, 1 tablespoon
  • self-raising flour, 1½ cups, sifted
  • cinnamon, ground, 1½ teaspoons
  • bicarbonate of soda, ¼ teaspoon


Method

  1. Preheat the oven to 180˚C and grease a small cake tin and line the base with paper.
  2. In a food processor, blend the bananas (with skin on) with the cinnamon, adding the milk as necessary to facilitate effective blending of the banana skin.
  3. Use an electric mixer to beat the butter, sugar and vanilla until pale and creamy, scraping down the sides of the bowl regularly. Add the eggs one at a time, then the pureed bananas and lastly the flour and bicarbonate of soda.
  4. Pour batter into the prepared tin and smooth with the back of a metal spoon or spatula.
  5. Bake in the pre-heated oven for 40-45 minutes. Cake is done when a skewer comes out Click here for a pdf version of this recipe.clean.
  6. Stand for 5 minutes before turning out onto a wire rack to cool.
  7. When the cake is completely cooled, ice with a lemon butter or cream cheese icing.

[1] Ideally, use bananas that are completely black, and put them in a freezer for a couple of hours, then defrost before use. Bananas with a little blackening will darken in the freezer.

Posted in Cake, Timor-Leste | Tagged , , , , , , | Leave a comment

Cherry Cake

Finding that our cherry tree was fruiting was a nice surprise this week, but stumbling over this recipe was better still.

On tasting the fantastic cherries from our tree, my first thought was for the punnet of bought cherries still in my fridge from the week before. They were of course edible, but who would have them when these amazing cherries were growing right in front of the house?

And since I had said at the office that I would bring a cake to work on Tuesday, on Monday I of course went looking for recipes for a cherry cake, something I had never even heard of.

2014-11-22 Blog 028asTwo recipes caught my attention. One was an almond cherry cake, and the other a Hungarian cherry cake. The combination of almond and cherry sounded great, but the Hungarian cake, with its big chunks of cherry on top and a breadcrumb base, was too good to ignore.

So, taking a bit of a risk, since I needed a cake I could serve the next day, I used some of the features of each recipe and came up with this, which I think does all the best things a cake should do.

The one in the picture, by the way, is my second one, made with cherries from our own tree, and with a minor adjustment to the proportion of almond meal to retain better moisture.

2014-11-22 Blog 035apbs

 Cherry Cake

Ingredients

  • cherries, 1 cup, pitted and halved
  • butter, unsalted, 170 grams, softened
  • sugar, caster, ¾ cup
  • eggs, 3, separated
  • plain flour, ⅔ cup, sifted
  • almond meal, ⅓ cup
  • salt, pinch
  • breadcrumbs, to cover base of pan


Method

  1. Preheat the oven to 180˚C and prepare a springform cake tin by greasing the sides and covering the base with breadcrumbs.
  2. Beat egg whites to soft peaks, adding half the sugar in the process.
  3. Cream the butter and remaining sugar then add egg yolks, flour, almond meal and salt.
  4. Gently fold the egg whites into the batter.
  5. Click here for a pdf version of this recipe.Pour the batter into the prepared cake tin and cover with cherries.
  6. Bake for 40 minutes or until a toothpick inserted into the cake comes out clean.
  7. Cool completely before serving.
Posted in Cake | Tagged , , , , , | Leave a comment